Frameless shower screens give bathrooms a clean, open, and modern look, but the installation needs accuracy and planning. A poorly fitted screen can move, leak, or even crack, so you must treat each step with care. Before you start drilling tiles or lifting heavy glass, walk through a clear plan, check all components, and confirm that your walls and floor can support the screen. This guide explains what to prepare, how to install each part, and which common mistakes you must avoid. With the right tools, secure fixings, and careful sealing, you can achieve a safe, leak‑free frameless shower that looks professional and lasts.
What Should You Prepare Before Installing a Frameless Screen?
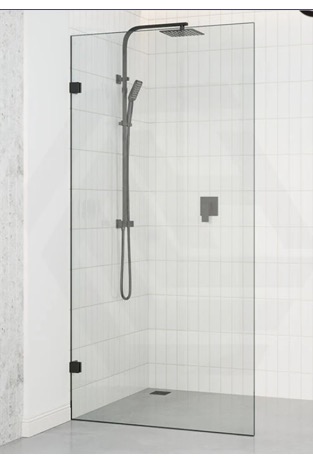
Tools and Materials Needed for Installation
Gathering the correct tools and materials before lifting any glass saves time and prevents mistakes. You usually need a tape measure, spirit level, pencil, masking tape, drill with masonry or tile bits, screwdriver set, rubber mallet, and silicone gun. Prepare wall plugs, stainless steel screws, shims or packers, and suitable silicone sealant for wet areas, preferably mould resistant. Have safety equipment ready: cut‑resistant gloves, safety glasses, and closed shoes. Lay down drop sheets or cardboard to protect tiles and the base from scratches. Keep the manufacturer’s instructions nearby because fixing methods differ between brands. Finally, keep all glass panels, hinges, brackets, and seals in one clean area, and check for damage or missing parts before you begin.
Measuring Space and Checking Wall Alignment
Accurate measuring decides how well frameless shower screens fits and seals. Use a quality tape measure and write each dimension down. Measure the width of the opening at the top, middle, and bottom, and record the smallest size for the glass width. Check the height from the shower base or tiled floor to the planned top of the screen. Next, check wall alignment with a long spirit level or straight edge. Look for any bowing or out‑of‑square corners because glass cannot bend to follow uneven walls. Small variations are normal, but larger ones may need packers or minor building work. Confirm that the shower tray or tiled hob is level, stable, and fully sealed before fitting any glass.
Understanding Glass Panels and Hardware Requirements
Frameless shower screens use toughened safety glass, usually 8–10 mm thick, which is heavy and must be handled correctly. Check each panel’s size, thickness, and edge finish against the order. Any chips or scratches near edges can weaken the glass, so set damaged panels aside and contact the supplier. Confirm that the hardware, such as hinges, wall brackets, and channels, matches the glass thickness and door weight rating. Fixings must suit your wall type, whether tile over brick, concrete, or timber stud. Read the manufacturer’s specification to see the minimum distance between fixings and any clearance gaps needed around doors for smooth, safe movement.
How to Install a Frameless Shower Screen Step by Step?
Positioning and Securing Glass Panels Safely
Always handle glass panels with two people and wear gloves. Start by marking the panel positions on the wall and base using a pencil and level. Dry‑fit the fixed panel first without sealant to check alignment and gaps to the wall and floor. Use plastic shims to hold a small, even gap at the bottom so water runs back into the tray. When you are satisfied, mark fixing hole positions through the wall brackets or channels. Remove the panel, drill the holes slowly through tiles, insert wall plugs, and then reinstall the glass. Tighten screws gently and evenly so you do not stress the glass, while keeping everything perfectly plumb.
Installing Hinges, Brackets, and Door Components
Once the fixed panel is secure, install hinges and door hardware according to the supplied template. Fit the hinges onto the door glass on a padded surface, using the correct gaskets for the glass thickness. Tighten clamp screws evenly and avoid over‑tightening. Lift the door into place with a helper and secure the hinges to the wall or fixed panel. Check that the door opens and closes freely without rubbing on the floor or seals. Install wall brackets, support bars, and clips that stabilize larger panels. Add door handles and any magnetic or rubber closing strips. Recheck all screws and make small adjustments so the door self‑closes gently into the correct position.
Sealing Edges and Testing for Water Leaks
After fixing the glass, clean all edges where sealant will go and make sure the surfaces are dry and dust free. Run a continuous bead of bathroom‑grade silicone along the outside base of the fixed panels and where glass meets walls, unless your manufacturer advises differently. Smooth the bead with a gloved finger or tool for a neat finish and strong seal. Avoid sealing inside joints that should allow drainage. Allow the silicone to cure for the recommended time, usually at least 24 hours. Then gently run the shower, directing water at joints and door edges. Check for drips or spray escaping, and reseal any weak points immediately.
What Mistakes Should You Avoid During Installation?
Incorrect Measurements and Poor Leveling
Many frameless shower problems come from bad measurements and poor leveling. If you measure only once, you may miss a bowed wall or a base that slopes the wrong way. That can cause uneven gaps, doors that swing open, or panels that do not sit square in their hardware. Use a level and measure each opening at several heights. Mark reference lines on the wall before drilling. If the tray is not level, fix that first rather than forcing glass to follow it. Never “pull” glass into position with screws because this can stress the panel and increase the risk of cracks later.
Improper Sealing and Waterproofing Issues
Rushed sealing often leads to leaks, mould, and damaged floors. Using the wrong type of silicone or applying it to wet or dusty surfaces prevents a proper bond. Gaps in the bead or sealing the wrong side of the joint can trap water where you cannot see it. Always use high‑quality, neutral‑cure silicone designed for bathrooms and follow curing times. Do not block designed drainage points or weep holes. Check that the shower base, tiles, and grout are fully waterproofed before adding the screen. If you see persistent moisture near the outside of the screen, strip the old silicone, dry the joint completely, and reseal carefully.
Skipping Final Checks and Safety Precautions
Once the screen is standing, it may look finished, but skipping final checks can leave hidden risks. Always test the door several times to ensure smooth movement and that it does not slam or hit fittings. Confirm all screws are tight and that support bars and brackets feel solid. Inspect the glass edges for new chips caused during installation. Run a full water test, including spraying corners and door gaps. Clean any glass dust, offcuts, or tools from the shower floor to avoid slips. Finally, explain safe use to all household members, especially children, and remind them not to hang heavy items from the door or brackets.

Conclusion
A frameless shower screen can transform a bathroom with clear lines and a spacious feel, but the installation leaves little room for error. Careful planning, precise measuring, and choosing the right hardware protect both the glass and the structure behind it. Working slowly with a level, checking walls and floors, and following the manufacturer’s instructions help you avoid stress on the panels. Strong sealing and a full water test keep the shower leak‑free. When in doubt, or if walls are badly out of square, consider hiring a professional installer to ensure your new frameless screen stays safe and beautiful.